Kaggle Local Dog Breed Recognition
After setting up the deep learning environment, the most natural next step is to run a simple inference example and verify that the local TensorFlow environment, model weights, and image preprocessing pipeline all work together.
This article uses a local dog-image recognition example for that purpose: load a pretrained ResNet50 model, preprocess a few images, run prediction, and decode the most likely labels. It works well as a first practical check that the full inference pipeline is actually running on your machine.
1. Load images to be predicted
from os.path import join

image_dir = 'train/'
img_paths = [join(image_dir, filename) for filename in
                               ['0246f44bb123ce3f91c939861eb97fb7.jpg',
                                '84728e78632c0910a69d33f82e62638c.jpg']]
Here we selected 2 images, saved in the list img_paths.
2. Define the function to read and preprocess images
import numpy as np
from tensorflow.python.keras.applications.resnet50 import preprocess_input
from tensorflow.python.keras.preprocessing.image import load_img, img_to_array

image_size = 224

def read_and_prep_images(img_paths, img_height=image_size, img_width=image_size):  # define processing function
    imgs = [load_img(img_path, target_size=(img_height, img_width)) for img_path in img_paths]
    img_array = np.array([img_to_array(img) for img in imgs])
    return preprocess_input(img_array)
3. Load the model and predict
from tensorflow.python.keras.applications import ResNet50
my_model = ResNet50(weights='../resnet50/resnet50_weights_tf_dim_ordering_tf_kernels.h5')
test_data = read_and_prep_images(img_paths)
preds = my_model.predict(test_data)
Two details matter here:
weightspoints to a locally downloaded model-weight file.- the later decoding step also depends on a local
imagenet_class_index.jsonlabel file.
So the practical focus of this post is not an online API call, but a fully local inference workflow.
4. View and visualize prediction results
import sys
# Add directory holding utility functions to path to allow importing
sys.path.append('~/utils')
from decode_predictions import decode_predictions
from IPython.display import Image, display
most_likely_labels = decode_predictions(preds, top=3, class_list_path='../resnet50/imagenet_class_index.json')
for i, img_path in enumerate(img_paths):
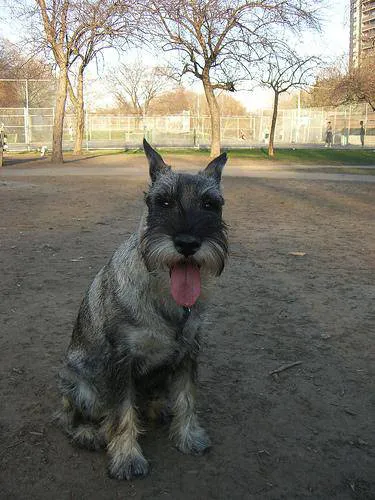
display(Image(img_path))
print(most_likely_labels[i])
[('n02097209', 'standard_schnauzer', 0.56502265), ('n02097047', 'miniature_schnauzer', 0.31319875), ('n02097130', 'giant_schnauzer', 0.045194548)]

[('n02092339', 'Weimaraner', 0.99767154), ('n02099849', 'Chesapeake_Bay_retriever', 0.001392837), ('n02109047', 'Great_Dane', 0.00032280287)]
You can see that the results are produced successfully and match the cloud-side output. For beginners, the most important part here is not the model sophistication itself, but the confirmation that local inference is working end to end: images load correctly, the model loads correctly, and the labels are decoded correctly.
Because official downloads can be slow and local path handling can be a source of errors, preparing the weights and helper files in advance saves a lot of friction.
To make it easier for beginners to test and run on local servers, I have downloaded the data and packaged my own test scripts on Baidu Netdisk. You can directly download and use them.
Data download link:
Link: https://pan.baidu.com/s/1UqK8mJF97VzKh5abuxkH8g Extraction code: cxkf
How to use
1. Unzip into current folder and run Jupyter Notebook
2. Open the dog_breed directory
3. Load and run run_model.ipynb in the directory
If you hit an error while running it locally, check three things first: the model-weight path, the imagenet_class_index.json path, and whether your TensorFlow/Keras version still matches the code style used in this notebook.
- 原文作者:春江暮客
- 原文链接:https://www.bobobk.com/en/127.html
- 版权声明:本作品采用 知识共享署名-非商业性使用-禁止演绎 4.0 国际许可协议 进行许可,非商业转载请注明出处(作者,原文链接),商业转载请联系作者获得授权。