kaggle之本地运行识别狗品种
2018-12-15
技术
在搭建了深度学习环境后,最自然的下一步就是先跑一个能看到结果的图像识别例子,确认本地 TensorFlow 环境、模型权重和图片预处理流程都没有问题。
这篇文章演示的是一个本地狗品种识别示例:用预训练的 ResNet50 模型读取狗图片,做预处理,然后输出最可能的类别结果。它很适合作为“环境已经装好,接下来先跑通一次推理流程”的入门测试。
1.加载待预测图片
from os.path import join

image_dir = 'train/'
img_paths = [join(image_dir, filename) for filename in
                               ['0246f44bb123ce3f91c939861eb97fb7.jpg',
                                '84728e78632c0910a69d33f82e62638c.jpg']]
这里选用了2张图片,保存在img_paths的list里面。
2.定义读取和预处理图片的函数
import numpy as np
from tensorflow.python.keras.applications.resnet50 import preprocess_input
from tensorflow.python.keras.preprocessing.image import load_img, img_to_array

image_size = 224

def read_and_prep_images(img_paths, img_height=image_size, img_width=image_size):##定义处理函数
	imgs = [load_img(img_path, target_size=(img_height, img_width)) for img_path in img_paths]
	img_array = np.array([img_to_array(img) for img in imgs])
	return preprocess_input(img_array)
3.导入模型并预测
from tensorflow.python.keras.applications import ResNet50
my_model = ResNet50(weights='../resnet50/resnet50_weights_tf_dim_ordering_tf_kernels.h5')
test_data = read_and_prep_images(img_paths)
preds = my_model.predict(test_data)
这里要注意两点:
weights指向的是本地已经下载好的模型权重文件。- 后面解码预测结果时,也依赖本地的
imagenet_class_index.json标签文件。
也就是说,这篇文章的重点不是在线调用接口,而是把完整的推理依赖都准备到本地后再运行。
4.查看并可视化预测结果
import sys
# Add directory holding utility functions to path to allow importing
sys.path.append('~/utils')
from decode_predictions import decode_predictions
from IPython.display import Image, display
most_likely_labels = decode_predictions(preds, top=3, class_list_path='../resnet50/imagenet_class_index.json')
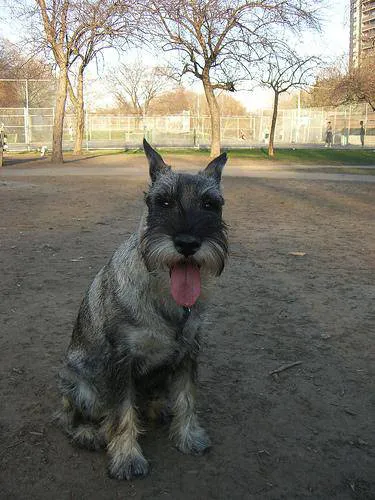
for i, img_path in enumerate(img_paths):
display(Image(img_path))
print(most_likely_labels[i])
[('n02097209', 'standard_schnauzer', 0.56502265), ('n02097047', 'miniature_schnauzer', 0.31319875), ('n02097130', 'giant_schnauzer', 0.045194548)]

[('n02092339', 'Weimaraner', 0.99767154), ('n02099849', 'Chesapeake_Bay_retriever', 0.001392837), ('n02109047', 'Great_Dane', 0.00032280287)]
可以看到,结果已经跑出来了,而且和云端运行结果一致。对初学者来说,这一步最重要的意义不是“模型有多先进”,而是确认本地推理流程已经真正跑通:图片能读、模型能载入、预测结果也能成功解码。
由于官方资源下载速度慢、路径处理细节又比较多,把权重和脚本提前整理到本地会省很多时间。
为方便新手在本地服务器上测试运行,我这里把数据下载好并将自己测试运行的脚本打包到百度网盘了,大家直接下载使用便是。
数据下载地址:
链接: https://pan.baidu.com/s/1UqK8mJF97VzKh5abuxkH8g 提取码: cxkf
使用方法
1.解压到当前文件夹,运行jupyter notebook
2.打开dog_breed目录
3.加载目录下的run_model.ipynb运行便可
如果运行时报错,优先检查三处:模型权重路径、imagenet_class_index.json 路径、以及 TensorFlow/Keras 版本是否和脚本写法兼容。
- 原文作者:春江暮客
- 原文链接:https://www.bobobk.com/127.html
- 版权声明:本作品采用 知识共享署名-非商业性使用-禁止演绎 4.0 国际许可协议 进行许可,非商业转载请注明出处(作者,原文链接),商业转载请联系作者获得授权。