Connect Codex to LiteLLM with Nginx as One Model Gateway
Codex can connect to a custom model endpoint, but the setup gets messy when you use OpenAI, Qwen, DeepSeek, Claude, and other providers at the same time. Every tool ends up carrying its own keys, base URLs, and model names.
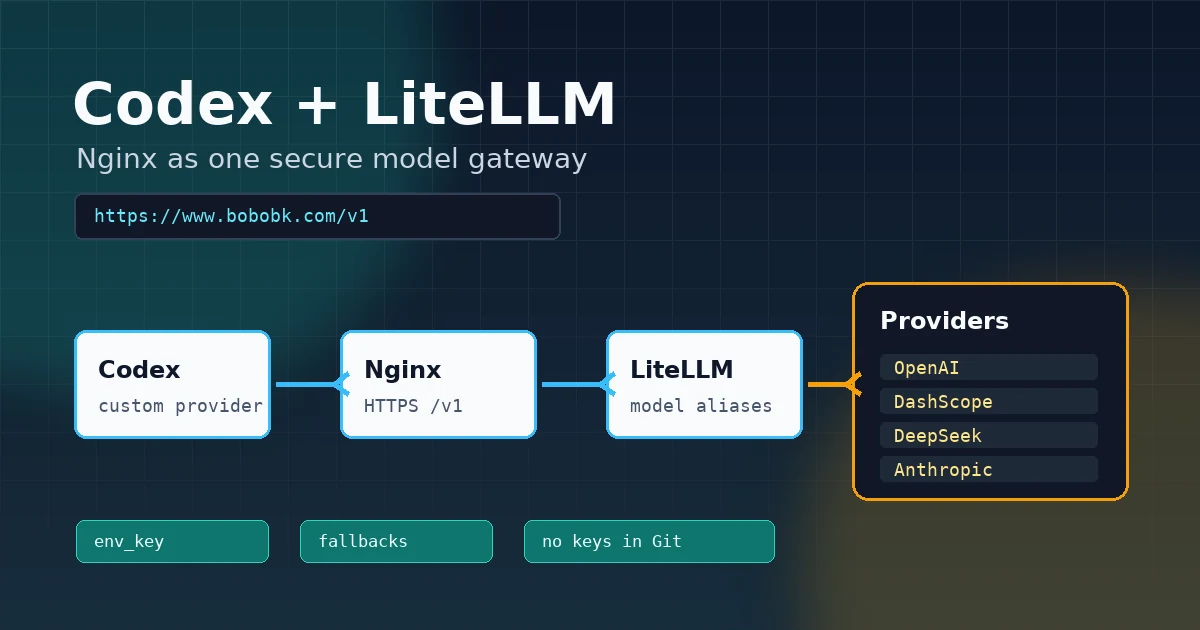
This article documents a cleaner setup: use LiteLLM on the server to define stable model aliases, use Nginx to proxy https://www.bobobk.com/v1 to local LiteLLM, and let Codex connect to that single gateway. The setup now also includes Langfuse, so successful and failed model calls become traces that are easier to inspect when debugging timeouts, fallbacks, and provider errors.
The final request path looks like this:
Codex
  -> https://www.bobobk.com/v1
  -> Nginx location /v1
  -> http://127.0.0.1:4000
  -> LiteLLM model aliases
  -> OpenAI / DashScope / DeepSeek / Anthropic
  -> Langfuse traces
The prerequisites are a working Codex install and a server domain with HTTPS configured. If Codex is not installed yet, start with the official install script:
curl -fsSL https://chatgpt.com/codex/install.sh | sh
If the install fails, it is usually a network access issue. Configure a proxy first, or install it on a server that can reach the internet.
Method 1: Define the Directory and Goal First
The LiteLLM setup in this article lives under the site directory:
/home/wwwroot/bobobk.com/llm
├── config.yaml
├── docker-compose.yml
├── .env.example
├── requirements.txt
├── run.sh
├── check.sh
└── litellm-proxy.service.example
The goal is specific:
- LiteLLM listens only on local port
4000 - Nginx exposes a public HTTPS
/v1endpoint - Codex uses a custom provider named
bobobk - Model keys live only in
llm/.envand local environment variables - Langfuse keys also live only in
llm/.env, not in posts or the repository - Real API keys never appear in blog posts, config examples, or Git
Method 2: Configure LiteLLM Model Aliases
1. Prepare .env
Enter the llm directory and copy the environment template:
cd /home/wwwroot/bobobk.com/llm
cp .env.example .env
nano .env
.env needs at least one LiteLLM master key. This key is the Bearer token clients use when calling LiteLLM:
LITELLM_MASTER_KEY=sk-change-me-long-random-value
LITELLM_HOST=0.0.0.0
LITELLM_PORT=4000
LITELLM_LOG=INFO

LANGFUSE_PUBLIC_KEY=pk-lf-...
LANGFUSE_SECRET_KEY=sk-lf-...
LANGFUSE_HOST=https://cloud.langfuse.com
LANGFUSE_TRACING_ENVIRONMENT=production

OPENAI_API_KEY=
DASHSCOPE_API_KEY=
DEEPSEEK_API_KEY=
ANTHROPIC_API_KEY=
For real usage, replace LITELLM_MASTER_KEY with a long random value and fill in the provider keys you want to enable. If you do not want Langfuse yet, leave LANGFUSE_PUBLIC_KEY and LANGFUSE_SECRET_KEY empty; if you want traces, copy the public key and secret key from your Langfuse project.
2. Write config.yaml
The core of config.yaml is model_list. It wraps different providers behind stable model aliases:
model_list:
  - model_name: gpt-5.5
    litellm_params:
      model: openai/gpt-5.5
      api_key: os.environ/OPENAI_API_KEY
      timeout: 600

  - model_name: gpt-image-2
    litellm_params:
      model: openai/gpt-image-2
      api_key: os.environ/OPENAI_API_KEY
      timeout: 600

  - model_name: tts-1-hd
    litellm_params:
      model: openai/tts-1-hd
      api_key: os.environ/OPENAI_API_KEY
      timeout: 600

  - model_name: qwen3.7-max
    litellm_params:
      model: openai/qwen3.7-max
      api_base: https://dashscope-us.aliyuncs.com/compatible-mode/v1
      api_key: os.environ/DASHSCOPE_API_KEY
      timeout: 600

  - model_name: deepseek-chat
    litellm_params:
      model: deepseek/deepseek-chat
      api_key: os.environ/DEEPSEEK_API_KEY
      timeout: 600

  - model_name: claude-4.6
    litellm_params:
      model: anthropic/claude-4-6-sonnet-latest
      api_key: os.environ/ANTHROPIC_API_KEY
      timeout: 600

router_settings:
  routing_strategy: simple-shuffle
  num_retries: 2
  max_fallbacks: 2

litellm_settings:
  drop_params: true
  request_timeout: 600
  success_callback:
    - langfuse_otel
  failure_callback:
    - langfuse_otel

general_settings:
  master_key: os.environ/LITELLM_MASTER_KEY

fallbacks:
  - gpt-5.5:
      - qwen3.7-max
      - deepseek-chat
  - qwen3.7-max:
      - deepseek-chat
  - claude-4.6:
      - deepseek-chat
The practical parts are:
model_nameis the model name Codex seesapi_key: os.environ/xxxkeeps secrets out of YAMLdrop_params: truemakes extra client parameters less likely to break requests across providersfallbackscan switch to backup models when the primary model failssuccess_callbackandfailure_callbackboth uselangfuse_otel, so successful and failed requests are sent to Langfuse
Method 3: Start LiteLLM
1. Start with the local runner
requirements.txt pins the local LiteLLM proxy dependency set. Create a project venv first:
cd /home/wwwroot/bobobk.com/llm
python3 -m venv .venv
.venv/bin/python -m pip install -r requirements.txt
run.sh loads .env from the current directory, prefers .venv/bin/litellm when it exists, and starts LiteLLM:
cd /home/wwwroot/bobobk.com/llm
chmod +x run.sh check.sh
./run.sh
The key command inside the script is:
exec litellm --config "$CONFIG_FILE" --host "$HOST" --port "$PORT"
For a quick test in the current shell, you can run it directly:
export LITELLM_MASTER_KEY=sk-change-me-long-random-value
.venv/bin/litellm --config config.yaml --host 0.0.0.0 --port 4000
2. Start with Docker Compose
If you prefer a container, use the included docker-compose.yml:
cd /home/wwwroot/bobobk.com/llm
docker compose up -d
docker compose logs -f litellm
The compose file reads .env, mounts config.yaml as read-only, and exposes container port 4000 on the server.
3. Start with systemd
For long-running service usage, use the systemd template:
cd /home/wwwroot/bobobk.com/llm
sudo cp litellm-proxy.service.example /etc/systemd/system/litellm-proxy.service
sudo systemctl daemon-reload
sudo systemctl enable --now litellm-proxy
sudo systemctl status litellm-proxy
Before copying, check that User, Group, WorkingDirectory, and ExecStart match your server path.
Method 4: Expose /v1 with Nginx
LiteLLM runs on 127.0.0.1:4000. Do not expose it directly to the public internet. On bobobk.com, the HTTPS site exposes a /v1 reverse proxy:
server {
    listen 443 ssl;
    http2 on;
    server_name bobobk.com www.bobobk.com;
    root /home/wwwroot/bobobk.com/public/;

    location /v1 {
        proxy_pass http://127.0.0.1:4000;
        proxy_set_header Host $host;
        proxy_set_header X-Real-IP $remote_addr;
        proxy_set_header X-Forwarded-For $proxy_add_x_forwarded_for;
        proxy_http_version 1.1;
        proxy_set_header Connection "";
    }
}
After editing Nginx, test and reload it:
sudo nginx -t
sudo systemctl reload nginx
Now this public endpoint:
https://www.bobobk.com/v1
routes to:
http://127.0.0.1:4000
Authentication is still controlled by LiteLLM through LITELLM_MASTER_KEY.
Method 5: Configure a Custom Codex Provider
The Codex config file is:
/home/teng/.codex/config.toml
The important part is:
model = "gpt-5.5"
model_provider = "bobobk"

[projects."/home/wwwroot/bobobk.com"]
trust_level = "trusted"

[model_providers.bobobk]
name = "bobobk"
base_url = "https://www.bobobk.com/v1"
env_key = "LITELLM_MASTER_KEY"
wire_api = "responses"
This means:
model = "gpt-5.5"makes Codex request the LiteLLM alias namedgpt-5.5by defaultmodel_provider = "bobobk"points Codex to the custom provider belowbase_urluses the HTTPS/v1endpoint exposed by Nginxenv_keytells Codex to read the Bearer token from an environment variablewire_api = "responses"makes Codex send requests using the Responses API wire format
Before starting Codex, export the same master key in your shell:
export LITELLM_MASTER_KEY=sk-change-me-long-random-value
codex
If you use zsh, write it to ~/.zshrc:
export LITELLM_MASTER_KEY=sk-change-me-long-random-value
Then reload the shell config:
source ~/.zshrc
Method 6: Add Langfuse Monitoring
LiteLLM monitoring is now configured directly in config.yaml:
litellm_settings:
  drop_params: true
  request_timeout: 600
  success_callback:
    - langfuse_otel
  failure_callback:
    - langfuse_otel
This means LiteLLM calls the langfuse_otel callback for both successful and failed requests. You only need to set the Langfuse project values in llm/.env:
LANGFUSE_PUBLIC_KEY=pk-lf-...
LANGFUSE_SECRET_KEY=sk-lf-...
LANGFUSE_HOST=https://cloud.langfuse.com
LANGFUSE_TRACING_ENVIRONMENT=production
Choose LANGFUSE_HOST based on where your project runs:
- EU cloud:
https://cloud.langfuse.com - US cloud:
https://us.cloud.langfuse.com - Self-hosted: your own Langfuse base URL
LiteLLM builds the OTEL endpoint as:
${LANGFUSE_HOST}/api/public/otel
After editing .env, restart LiteLLM:
sudo systemctl restart litellm-proxy
If you use Docker Compose:
docker compose restart litellm
Then send one normal model request through Nginx or the local proxy. After the request completes, open the matching Langfuse project and check for a new trace.
Method 7: Validate the Full Path
1. Check the local LiteLLM port
Run this on the server:
cd /home/wwwroot/bobobk.com/llm
./check.sh
Expected readiness output:
Readiness:
{"status":"healthy"}
If LITELLM_MASTER_KEY is set, the script also requests the model list:
curl -fsS http://127.0.0.1:4000/v1/models \
  -H "Authorization: Bearer ${LITELLM_MASTER_KEY}"
You can also run one smoke chat with a model name:
./check.sh gpt-5.5
2. Check the Nginx HTTPS endpoint
Run this from the server or your local machine:
curl -fsS https://www.bobobk.com/v1/models \
  -H "Authorization: Bearer ${LITELLM_MASTER_KEY}"
If it returns a model list, the Nginx-to-LiteLLM proxy is working.
3. Send one Responses request
Because the Codex config uses wire_api = "responses", run a Responses-style smoke test first:
curl https://www.bobobk.com/v1/responses \
  -H "Authorization: Bearer ${LITELLM_MASTER_KEY}" \
  -H "Content-Type: application/json" \
  -d '{
    "model": "gpt-5.5",
    "input": "Reply with one short sentence.",
    "max_output_tokens": 32
  }'
If your LiteLLM version or upstream model works better with Chat Completions, test that path too:
curl https://www.bobobk.com/v1/chat/completions \
  -H "Authorization: Bearer ${LITELLM_MASTER_KEY}" \
  -H "Content-Type: application/json" \
  -d '{
    "model": "gpt-5.5",
    "messages": [
      {"role": "user", "content": "Reply with one short sentence."}
    ],
    "max_tokens": 32
  }'
If the model request returns content, the Codex side usually only needs the model, model_provider, env_key, and wire_api values to match.
4. Check the Langfuse trace
After sending one request, open the Langfuse project and look at the newest trace by time. Confirm three details:
- The trace environment is
production - Input, output, model name, and latency are visible
- Failed requests also show error details
If the request returns content but Langfuse shows no trace, check LANGFUSE_PUBLIC_KEY, LANGFUSE_SECRET_KEY, and LANGFUSE_HOST in .env first.
5. Check the Real Codex Status
After the config is ready, enter the target directory and start Codex:
cd /home/wwwroot/bobobk.com
codex
The startup screen shows the current model and directory, for example:
⚠ Codex could not find bubblewrap on PATH. Install bubblewrap with your OS package manager.

╭───────────────────────────────────────────╮
│ >_ OpenAI Codex (v0.136.0)                │
│                                           │
│ model:     gpt-5.5   /model to change │
│ directory: /home/wwwroot/bobobk.com       │
╰───────────────────────────────────────────╯
Enter /status to confirm which provider Codex is using:
/status

╭─────────────────────────────────────────────────────────────────────╮
│  >_ OpenAI Codex (v0.136.0)                                         │
│                                                                     │
│  Model:                gpt-5.5 (reasoning none, summaries auto)     │
│  Model provider:       bobobk - https://www.bobobk.com/v1           │
│  Directory:            /home/wwwroot/bobobk.com                     │
│  Permissions:          Workspace (Ask for approval)                 │
│  Agents.md:            AGENTS.md                                    │
│  Collaboration mode:   Default                                      │
│  Token usage:          0 total  (0 input + 0 output)                │
╰─────────────────────────────────────────────────────────────────────╯
When you see Model provider: bobobk - https://www.bobobk.com/v1, Codex is using your own API gateway.
Troubleshooting
1. Codex reports an authentication error
The usual cause is that the current shell running Codex does not have LITELLM_MASTER_KEY.
Check it:
echo "$LITELLM_MASTER_KEY"
Fix it:
export LITELLM_MASTER_KEY=sk-change-me-long-random-value
codex
2. /v1/models returns 401
The request is missing the Authorization header, or the header key does not match the LiteLLM .env value.
Fix it:
curl -fsS https://www.bobobk.com/v1/models \
  -H "Authorization: Bearer ${LITELLM_MASTER_KEY}"
3. Nginx returns 502
LiteLLM is probably not running, or it is listening on a different port.
Check it:
ss -lntp | grep 4000
cd /home/wwwroot/bobobk.com/llm
./check.sh
Fix it:
cd /home/wwwroot/bobobk.com/llm
./run.sh
4. Responses fails, but chat completions works
The usual cause is that the LiteLLM version, upstream provider, or model alias does not handle the Responses format correctly.
First confirm the model works through chat completions:
curl https://www.bobobk.com/v1/chat/completions \
  -H "Authorization: Bearer ${LITELLM_MASTER_KEY}" \
  -H "Content-Type: application/json" \
  -d '{
    "model": "gpt-5.5",
    "messages": [
      {"role": "user", "content": "Reply with ok."}
    ],
    "max_tokens": 16
  }'
If chat completions works but Codex still fails, upgrade LiteLLM or adjust the Codex provider wire_api to the OpenAI-compatible chat setting supported by your current Codex version.
5. A model alias does not work
The provider key is usually missing, or the provider model name is wrong.
Check the related environment variables:
grep -E 'OPENAI_API_KEY|DASHSCOPE_API_KEY|DEEPSEEK_API_KEY|ANTHROPIC_API_KEY' .env
After fixing the file, restart LiteLLM:
sudo systemctl restart litellm-proxy
If you use Docker Compose:
docker compose restart litellm
6. Langfuse shows no trace
The usual cause is that the LiteLLM process did not read .env, or the Langfuse host/key values are wrong.
Check them:
cd /home/wwwroot/bobobk.com/llm
grep -E 'LANGFUSE_PUBLIC_KEY|LANGFUSE_SECRET_KEY|LANGFUSE_HOST|LANGFUSE_TRACING_ENVIRONMENT' .env
After fixing the values, restart LiteLLM and send one real model request:
sudo systemctl restart litellm-proxy
curl https://www.bobobk.com/v1/chat/completions \
  -H "Authorization: Bearer ${LITELLM_MASTER_KEY}" \
  -H "Content-Type: application/json" \
  -d '{
    "model": "gpt-5.5",
    "messages": [
      {"role": "user", "content": "Reply with ok."}
    ],
    "max_tokens": 16
  }'
For a self-hosted Langfuse instance, also confirm that the server can reach ${LANGFUSE_HOST}/api/public/otel.
Summary
The core idea is to collapse model access into one stable gateway: LiteLLM owns model aliases, fallbacks, provider keys, and Langfuse callbacks; Nginx owns HTTPS and the public endpoint; Codex only needs one base_url and one default model name.
Do not write real API keys or Langfuse keys into Codex config, Hugo posts, or Git. Keep secrets in .env and shell environment variables, then let Codex read the token through env_key. After that, switching models, providers, or monitoring environments usually means editing LiteLLM config instead of touching every client.
- 原文作者:春江暮客
- 原文链接:https://www.bobobk.com/en/codex-litellm-nginx-proxy.html
- 版权声明:本作品采用 知识共享署名-非商业性使用-禁止演绎 4.0 国际许可协议 进行许可,非商业转载请注明出处(作者,原文链接),商业转载请联系作者获得授权。