Setting up TensorFlow Deep Learning Server Environment
The lab just got a new server with an NVIDIA 1080Ti for deep learning work. After the hardware was ready, the first real task was getting a usable TensorFlow GPU environment in place. This article records that setup process and the compatibility problems that came with it.
The operating system is Ubuntu 18.04.1 LTS, prepared by my senior (you can check with lsb_release -v). Of course, the first step is to Google it. I found an article: setup-an-environment-for-machine-learning-and-deep-learning-with-anaconda-in-windows. The next step is to follow the instructions.
One important note before you follow the commands literally: this article describes an older TensorFlow GPU stack. The main lesson is the compatibility relationship between TensorFlow, CUDA, cuDNN, and the driver, not that these exact versions are always the right choice today. For modern setups, check the official compatibility matrix first.
The setup process is divided into 6 steps:
- Download Anaconda
- Install Anaconda & Python (Ubuntu comes with Python 3)
- Update Anaconda
- Install CUDA & cuDNN (cuDNN does not need to be installed manually, often)
- Install TensorFlow & Keras
- CUDA version switching (not needed if installed correctly)
Steps 1, 2, and 3 are standard and relatively simple. I’ll briefly explain them.
Before You Start
- Make sure the machine already has a working NVIDIA GPU and driver.
- Treat this as a legacy TensorFlow GPU environment recipe, not a universal latest-version guide.
- Optimize for version compatibility first, not for having every component on the newest release.
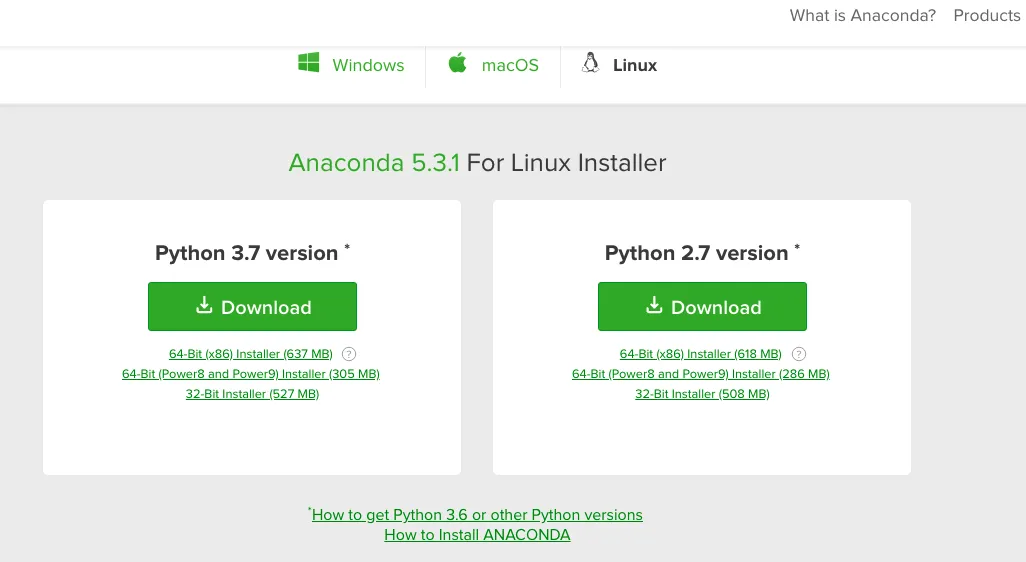
1. Download Anaconda
Go to Anaconda to download the Linux version of Python 3.7. Since the server is Ubuntu 18, I downloaded the Python 3.7 version.
2. Install Anaconda & Python (Ubuntu comes with Python 3)
bash Anaconda3-5.3.1-Linux-x86_64.sh
Follow the prompts to successfully install it. If you use zsh as your default shell, like I do, you’ll need to copy the following code that Anaconda automatically adds to .bashrc during installation:
Copy this to the end of your .zshrc file, then source ~/.zshrc to activate it. Type conda in the terminal, and if you see the help message, it’s installed.
3. Update Anaconda
Enter the following commands in the terminal to update conda:
conda update conda
conda update --all
4. Install CUDA & cuDNN
The key part is the installation of CUDA and cuDNN. I had a lot of trouble with this step. Here, I’ll tell you the correct way.
First, go to the NVIDIA Developer website to download the CUDA 9.0 version for your graphics card. It’s crucial to note that TensorFlow only supports CUDA 9.0 (emphasis added; the official website defaults to version 10.0, which caused me a lot of trouble).
Once CUDA is downloaded, it’s simple:
sudo dpkg -i cuda-repo-ubuntu1704-9-0-local_9.0.176-1_amd64-deb
sudo apt-key add /var/cuda-repo-9-0-local/7fa2af80.pub
sudo apt-get update
sudo apt-get install cuda
After installation, you need to downgrade the GCC version and add environment variables. Use the following commands:
sudo apt install gcc-5 g++-5
sudo update-alternatives --install /usr/bin/gcc gcc /usr/bin/gcc-5 50
sudo update-alternatives --install /usr/bin/g++ g++ /usr/bin/g++-5 50
export LD_LIBRARY_PATH=/usr/local/cuda-9.0/lib64:/usr/local/cuda/extras/CPUTI/lib64
export CUDA_HOME=/usr/local/cuda-9.0/bin
export PATH=$PATH:$LD_LIBRARY_PATH:$CUDA_HOME
cuDNN Installation
You need to register an account on NVIDIA Developer, then download the runtime and develop .deb packages and install them. Use dpkg for installation
sudo dpkg -i libcudnn7_7.0.5.15-1_cuda9.0_amd64.deb
sudo dpkg -i libcudnn7-dev_7.0.5.15-Bcuda9.0_amd64.deb
sudo dpkg -i libcudnn7-doc_7.0.5.15-1+cuda9.0_amd64.deb # Optional
5. Install TensorFlow & Keras
You can directly install them using Anaconda:
conda install -c anaconda tensorflow-gpu
conda install -c conda-forge keras-gpu
The -gpu suffix indicates the GPU version. Without it, you’d install the CPU version. Since the server has a graphics card, it’s better to download the GPU version to leverage its advantages.
6. CUDA Version Switching (not needed if installed correctly)
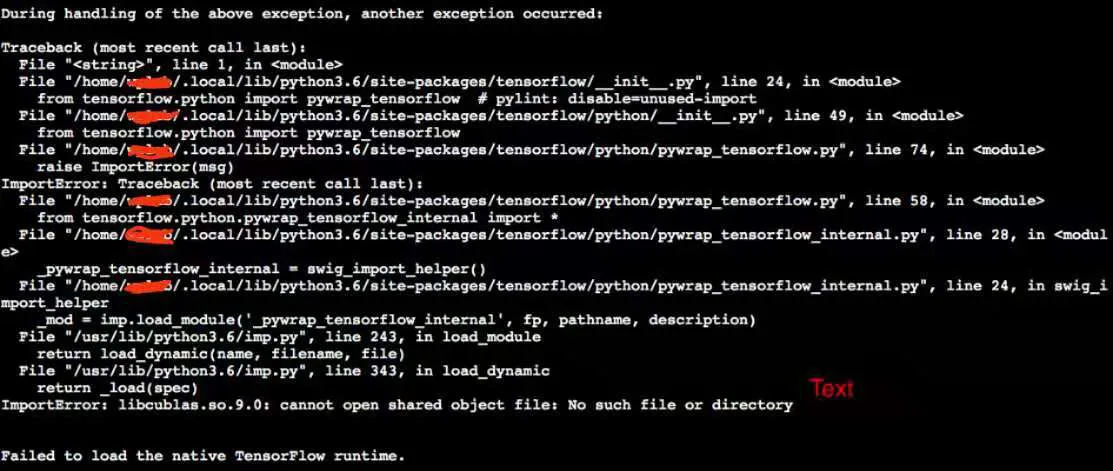
Use the following command to check if the TensorFlow environment is set up:
python -c "import tensorflow as tf;"
If you get an error like this, it means there’s a CUDA issue. After searching, I found it’s because libcublas.so.9.0 (which is part of CUDA 9.0) cannot be found. This was due to initially installing the latest CUDA 10, which was a major pitfall.
So, you’ll need to uninstall CUDA 10:
sudo apt-get remove cuda*
sudo apt remove --purge nvidia*
rm /etc/apt/sources.list.d/cuda-10-0-local-10.0.130-410.48.list
sudo apt autoremove
sudo rm -rf /var/cuda-repo-10-0-local-10.0.130-410.48
sudo rm -rf /usr/local/cuda*
Run all these commands, and then reinstall as described in step 4. After that, running python -c “import tensorflow as tf;” should no longer show errors. Next, use the following to verify the successful installation of the TensorFlow GPU version. You should see that the 1080Ti has been successfully recognized by TensorFlow.
from tensorflow.python.client import device_lib
local_device_protos = device_lib.list_local_devices()
How to Confirm the Environment Really Works
After installation, check at least these three things:
python -c "import tensorflow as tf;"runs without CUDA-related import errors.device_lib.list_local_devices()shows a GPU device.nvcc --version,nvidia-smi, and the TensorFlow build you installed are not pointing to conflicting CUDA expectations.
Summary
This guide documents one complete Ubuntu 18.04 TensorFlow GPU setup path, from Anaconda to CUDA, cuDNN, and final GPU detection. The biggest problem was never the shell commands themselves, but version compatibility across TensorFlow, CUDA, cuDNN, and the NVIDIA driver.
If you repeat this process today and hit a mismatch, do not assume TensorFlow is broken first. Check the compatibility matrix, then decide whether you should downgrade CUDA or move to a TensorFlow version that matches the stack you actually want to run.
- 原文作者:春江暮客
- 原文链接:https://www.bobobk.com/en/70.html
- 版权声明:本作品采用 知识共享署名-非商业性使用-禁止演绎 4.0 国际许可协议 进行许可,非商业转载请注明出处(作者,原文链接),商业转载请联系作者获得授权。